Switchglaive Confusion Build
 Onmyo Switchglaive
Stacks Life Recovery (Amrita Absorption) past 100 so every hit restores health, then locks enemies into the Confusion debuff by combining Purity with a Lightning or Water Familiar. Heavy armor and a 99 Constitution stat make this build nearly unkillable, capable of face-tanking bosses on Dream of the Demon while severely under-leveled.
Damage
Confusion debuff multiplies damage taken and destroys enemy Ki. Bosses stunlocked and speedrun on Dream of the Demon at level 191 vs. end-game enemies.
Survivability
100+ Life Recovery heals ~50 HP per hit through Extraction Talisman. Heavy armor, 99 Constitution, and Ho-Oh's -7% Yokai damage reduction make this build nearly unkillable while attacking.
Boss
Trivializes all bosses through Dream of the Wise. Creator demonstrated stunlocking and speedrunning end-game bosses on Dream of the Demon at level 191 without dying. Requires Crime of Patricide swap for Dream of the Nioh.
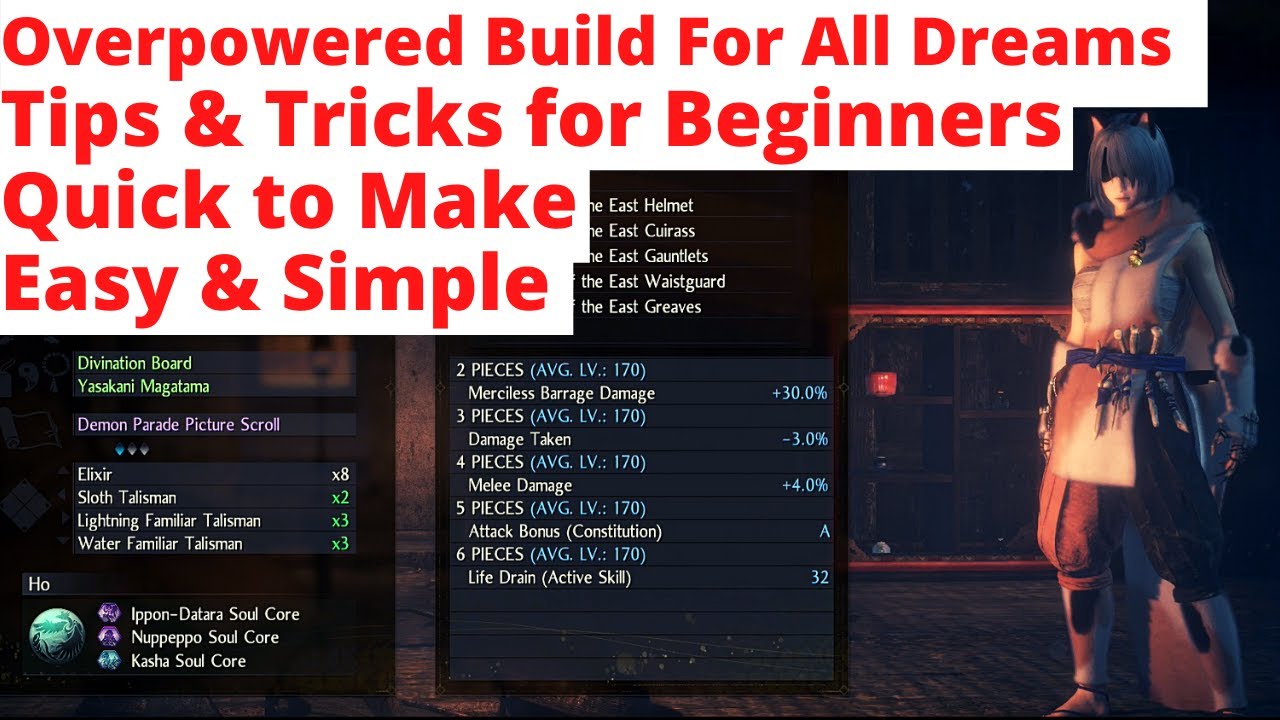
Onmyo Switchglaive
Magic-and-Constitution hybrid that wields the Switchglaive, which scales naturally with both stats to maximize spell capacity, weapon damage, and health simultaneously. Onmyo Magic provides the elemental Familiars and Talismans that fuel the Confusion debuff loop, while Constitution drives raw weapon damage and activates the Warrior of the East 5-piece set bonus.
The build's primary weapon. Scales with both Constitution (B+) and Magic (A-) after Double Remodeling at the Blacksmith, letting a single stat investment serve both weapon damage and spell capacity. Weapons with the Imbued Purity property apply Purity element on every hit without consuming Talisman inventory.
Alternatives
- SplitstaffWiki
How to Obtain

The full five-piece set grants Attack Bonus (Constitution A), converting every point of Constitution into both offensive damage and health. Equipping the Yasakani Magatama reduces the active piece requirement by 1, so the 5-piece bonus activates with only 4 pieces equipped. Roll Life Recovery (Amrita Absorption) on the Cuirass for maximum healing throughput.
How to Obtain

Reduces any equipped set's active piece requirement by 1, letting the Warrior of the East 5-piece bonus activate with only 4 armor pieces. This frees a fifth slot for a different piece with better-rolled stats. Roll Life Recovery (Amrita Absorption) and Extended Elemental Weapon for maximum healing and longer buff windows.
How to Obtain

Phantom-type spirit that passively boosts Purity buildup on enemies and deals bonus melee damage against Purified targets once Dexterity + Constitution reaches 51. Calming Breath restores 8% health per second when no enemies are aggro, keeping health topped off between pulls. Automatically unlocked after obtaining both Ho and Oh.
Alternatives
- Ho (Budget Primary Spirit)Wiki
How to Obtain


Unlocks the Hellfire Wheel yokai skill, which applies Fire element rapidly and deals high damage. Used in burst windows as a third element alongside Purity and the active Familiar to maximize debuff pressure on bosses. The Life Drain on yokai ability hits scales up to AA+ at rank 30, making it self-sustaining during activation.
How to Obtain

Combat Strategy
- ▸Apply Extraction Talisman to start the healing loop before the first hit lands.
- ▸Apply Barrier Talisman to boost Ki recovery and auto-dispel Yokai Realm pools.
- ▸Use Quick-Change Scroll for a free revive cushion before bosses and tough mini-boss fights.
- ▸Apply Purification Talisman if the weapon does not have the Imbued Purity property.
- ▸Cast a Lightning Familiar or Water Familiar, then run directly up to the enemy so the orbiting orbs apply the first elemental buildup stack on contact.
- ▸Against human bosses, open with a ranged head shot to knock them down before closing the distance.
- ▸Follow the Familiar cast with a Strong Attack to direct all four orbs at the target simultaneously for faster elemental accumulation.
- ▸Spam Empty Retribution (High Stance) and Cyclone in the enemy's face to rapidly stack Purity from weapon strikes.
- ▸Purity from the weapon combined with the Familiar's element (Lightning or Water) triggers Confusion, reducing the enemy's Ki and increasing damage they take.
- ▸Keep attacking continuously. The Extraction Talisman drops Amrita on every hit and the Life Recovery stack converts it to health, making constant melee safer than backing off.
- ▸Activate the Nuppeppo soul core during Confusion-staggered windows when the boss is exposed for free damage.
- ▸Use the Kasha soul core's Hellfire Wheel to apply Fire as a third element, stacking additional debuff pressure or triggering a second elemental reaction against bosses resistant to Lightning or Water.
- ▸Natural burst windows occur when a Ki Break stuns the enemy — activate soul cores immediately as they stagger.
- ▸Aggression is the primary defense: stopping attacks cuts off Amrita drops and shuts down the healing loop.
- ▸If health drops critically low, fall back briefly and let Ho-Oh's Calming Breath restore 8% HP per second before re-engaging.
- ▸Never equip heavy armor unless Stamina is high enough to stay under 70% equipment weight. Dropping to C Agility kills Ki recovery and makes the build unplayable.
Sources
Verified: 2026-04-30 · All content is original with full credit to original creators.