Ultimate Status Effect Debuff Build
 Onmyo Switchglaive
Layers Scorched, Poison, Corruption, Purity, Electrified, and Saturated onto the same target, then cashes those debuffs in through Melee Damage vs Poisoned, Active Skill Ki Damage, and the 50% damage amplifier that Confusion applies for free. Grace of Tsukuyomi turns every Onmyo cast into a melee damage buff that your melee hits then refund, so spells and combos fund each other instead of competing. The armor is light and the defense is thin, so range, evasion, and resource tracking do the work that raw toughness would.
Damage
Confusion adds +50% damage taken, Melee vs Poisoned reaches 61%, Active Skill Ki Damage 45%. The debuff stack does the scaling, not raw attack.
Survivability
Path of the Ravenous heals on every Amrita pickup through Extraction Talisman. Light armor and low toughness mean one-shots are real.
Boss
Five stacked debuffs pay off most in long single-target fights. Confusion's +50% damage taken and 61% melee vs Poisoned compound while 45% Active Skill Ki Damage forces Ki breaks into grapples.

Onmyo Switchglaive
Onmyo Magic is Nioh 2's spell school, thrown from consumable talismans that you stock at a shrine before a mission. It scales off the Magic stat and covers every element in the game, which is what lets one character carry a debuff for any weakness an enemy might have. The Switchglaive is the weapon that pairs with it, a three-form polearm that also scales off Magic and switches between scythe, glaive, and guillotine as you change stance.
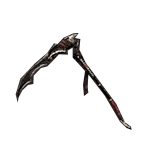
Mumyo's switchglaive and the recommended base for the build. It scales B+ from Magic on top of C Constitution and C Skill, so the same 200 Magic that powers your talismans also powers your melee. Its fixed Active Skill Damage effect stacks with the Active Skill Ki Damage rolls the build chases, which is what turns ordinary combo enders into Ki breakers. A switchglaive is not compulsory, but nothing else matches its stance-transition combo flow.
Target Rolls
- ▸Active Skill Ki Damage— The highest-value roll on the weapon. The whole melee half of the build is active skills, so this is what strips enemy Ki fast enough to force Ki breaks.
- ▸Imbued Poison— Applies Poison on every hit with no talisman spend, which keeps the Melee Damage vs Poisoned bonus live for free through an entire fight.
- ▸Poison Accumulation (Enemy)— Shortens the time between first contact and the Poison proc. Stacks with Shirohami and the Toxic Slime core toward the 71% accumulation ceiling.
- ▸Mystic Dyad— Ethereal-rarity effect that lets both Switchglaive Mystic Arts run at once instead of forcing a choice. Also available fixed on The Protection of Kannon+ and on Grace of Susano at 7 pieces.
Alternatives
- HatchetsWiki
- Any rapid-attack weapon
How to Obtain
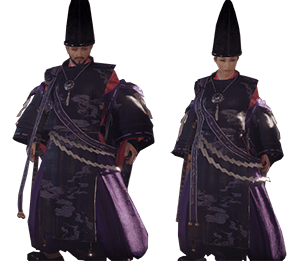
Light armor set built entirely around Onmyo Magic. Four Ethereal pieces plus the Set Bonus Requirement -1 accessory count as five, which reaches Untouched Onmyo Magic +15% and the Ultimate Magic bonus on the + version. Untouched Onmyo is the effect that gives spells a chance not to be consumed, and it is the first half of why this build never runs out of talismans. The helmet slot is left open for the Brilliant Strategem piece.
Target Rolls
- ▸Untouched Onmyo Magic (all pieces)— Stack it on every armor piece toward the build's 61% total. Inherit it from another armor part at the Blacksmith if a piece rolls without it.
- ▸Active Skill Ki Damage (all pieces)— The second universal armor roll. More Ki damage on active skills means faster Ki breaks and more Melee vs Zero-Ki uptime.
- ▸Arc of Chaos Damage (Bracers)— Custom active skill roll specific to the arm guards. Arc of Chaos is the single best switchglaive skill in the build, so buffing it directly is worth the slot.
How to Obtain

The most important single item in the build. Set Bonus Requirement -1 is a rare star effect that appears on accessories in Dream of the Nioh, and it makes every set count one piece higher than what you are actually wearing. That one line pushes six Grace of Tsukuyomi pieces to the seven-piece tier for Empowered Onmyo Magic, four Seimei pieces to the five-piece tier for Untouched Onmyo Magic and Ultimate Magic, and the lone Brilliant Strategem helmet to the two-piece tier for Blindness. It also carries Grace of Tsukuyomi itself.
Target Rolls
- ▸Poison Accumulation (Enemy)— Accessories are the best home for accumulation rolls. Aim for as much as the two slots will carry.
- ▸Melee Damage vs Poisoned Enemy— The payoff side of the poison loop. The build targets 39% here before Shirohami and the soul cores push it to 61%.
- ▸Extended Curse Nullification— Cuts the Underworld curse effects that would otherwise gut a light-armor character on deep floors.
Alternatives
- Yasakani MagatamaWiki
How to Obtain


A Phantom-type spirit tuned almost exactly to this build's shape. It pays anima for Onmyo hits and for ranged hits, raises all elemental damage, and adds 10% Yokai Ability Damage against any ailing enemy, which is every enemy you fight. The guardian spirit skill fires a beam that applies Corruption heavily, giving you a fifth element on demand without spending a talisman.
How to Obtain


The best in-fight soul core in the game for this build. It is cheap enough at 7 anima to spam between combos, its One-legged Fury animation reduces incoming damage while it plays, and it hits harder in the Yokai Realm. Its fixed Yokai Ability Damage against Scorched enemies scales to 31.5% at rank 30, which lines up perfectly with a build that opens every fight with Fire Shot.
How to Obtain





Every soul core has an optional effect slot, and the build wants the same thing from all of them. Use inheritance at the Blacksmith to force at least one line onto each of the three cores you actually run, and treat whatever else rolls as filler.

Part of the Itokuri paralysis package. Lockjaw is a long-reach grab, and the core's fixed lines cover both halves of the swap: Melee Damage vs Saturated Enemy for water-based openers, and an Anima Bonus that triggers specifically on poisoned enemies, so it still pays out if you left Poison running before switching spirits.
How to Obtain


Combat Strategy
- ▸Apply Extraction Talisman so that enemies start dropping Amrita, which Path of the Ravenous converts into health.
- ▸Apply Purification Talisman to the weapon for Purity, worth 50% extra Ki damage taken on anything you hit.
- ▸Apply Barrier Talisman for faster Ki recovery and automatic Yokai Realm pool clearing.
- ▸Apply Archyokai Talisman before bosses so the 50% anima bonus keeps soul cores firing throughout the fight.
- ▸Keep a Quick-Change Scroll active. This build gets one-shot when it misjudges a hit.
- ▸Against low-threat groups, lead with a single Fire Shot. Scorched, Blindness, Sloth, and Reduced Defense all land from that one throw.
- ▸Against tougher targets, place a Lightning Shikigami first and then throw Fire Shot into it. Two elements on one target triggers Confusion immediately for +50% damage taken.
- ▸Cast the Water Familiar to keep four orbs circling you, so Saturated keeps applying while you concentrate on positioning.
- ▸Use a single Toxic Slime soul core when you want Poison up fast, which switches on the Melee Damage vs Poisoned bonus that every accessory roll has been feeding.
- ▸Work from Mid Stance with Mind's Edge as the default, chaining Switch Stance skills to build both Mystic Art charge counters toward five.
- ▸Rotate into High Stance for Arc of Chaos and Cyclone when you have space, since Arc of Chaos has the longest reach in the moveset and hits up to three times.
- ▸Every melee hit refunds Onmyo through Empowered Onmyo Magic and drops Amrita through Extraction Talisman, so a sustained combo is simultaneously your damage, your spell economy, and your healing.
- ▸Fire Ippon-Datara between or at the end of combos. At 7 anima it is cheap, it reduces incoming damage while it plays, and it hits harder against the Scorched targets you have already made.
- ▸Reapply expiring debuffs rather than letting the stack lapse. Losing Poison or Purity costs more damage than the cast costs you.
- ▸Stack the full prep set before engaging: Quick-Change Scroll, Extraction Talisman, Purification Talisman on the weapon, Barrier Talisman, and Archyokai Talisman.
- ▸Use everything. Bosses have the health pool to make a five-debuff stack worth the casting time that a trash pack does not.
- ▸Track buff and debuff timers actively and refresh them. Managing the clocks is most of the skill in this build.
- ▸When the boss is winded and waiting for a grapple, trigger Yokai Shift first so the grapple lands at transformed damage, then spend Ryomen Sukuna and the rest of your cores while anima is free.
- ▸Use Oboroguruma when something closes on you. Murky Fog pushes enemies away, cuts incoming damage, and applies the best Corruption in the game on the way out.
Sources
Verified: 2026-09-08 · All content is original with full credit to original creators.