Divine Gear and Yasakani Farming: Four Endgame Spots
A luck-stacked farming setup and four routes that use it, aimed at the two things endgame Nioh 3 actually gates you on: Divine-rarity gear and the Yasakani Magatama. The headline method is a 19 second well loop that checks a guaranteed Divine drop and resets with a Travel Amulet, averaging 5 to 8 Yasakani an hour. The other three spots trade that focus for volume, clearing packs with Hellfire and Hellshock for gear, gold, and soul cores. If you want Amrita and gold rather than gear, the companion guide covers the fastest leveling loops from the same creator.
Before you start
- Beat the final boss once. Divine-rarity items do not drop before that
- Character level roughly 130 to 165 for the initial luck setup
- Access to the final battle of Edo, which unlocks A Sinister End under Heir's Journey
- Access to the Kyoto Imperial Palace Crucible and the Scion of the Gods battle scroll
- Clan protection set to Gamo for Luck and Asakura for Equipment Drop Rate
- At least 500 Travel Amulets, bought from the Sudama in the Eternal Rift
Builds that make this easier
Items / Buffs



Setup: The Luck Build and Prep
Assemble the initial luck build
Run three pieces of the Sohaya Set for its 3-piece Luck (Crucible) +100, and three pieces of the Iga Jonin Set for its 3-piece Ninjutsu Damage bonus. Slot a level 159 weapon carrying Equipment Drop Rate +4%, fill your accessory slots with Divination Boards or anything else rolling item drop rate, set your Guardian Spirit to Ho, and equip two Scampuss Soul Cores. The creator quotes the Iga Jonin bonus as 13%, though the wiki lists it as 10.2%.
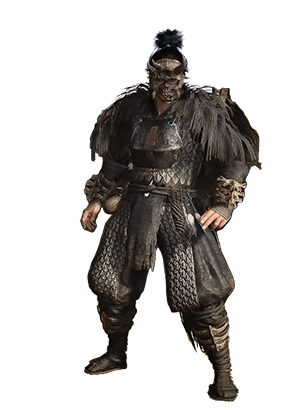
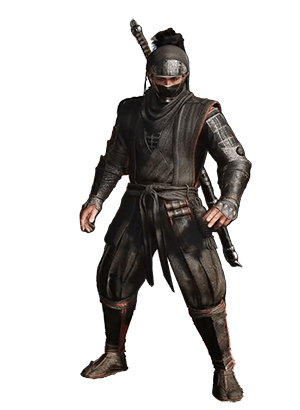


Disable automatic looting
Open the in-game options and turn automatic looting off before you start. This is not a preference, it is load-bearing for the well method. The whole loop depends on being able to inspect a corpse without picking anything up, and auto-loot removes that choice.
The Well Loop: Yasakani Farm
Load A Sinister End under Heir's Journey
Start the A Sinister End mission from Heir's Journey, which is your first playthrough. Do not run it under Shogun or New Game Plus, since the drop behaviour this loop relies on is tied to that difficulty. When you spawn in, leave the first shrine alone and do not activate it.
Turn around and drop into the well
Immediately turn 180 degrees and run to the well directly in front of you. Jump in and follow the water passageway to the end. There is nothing to fight and nothing to decide on the way down, which is exactly why this loop is so fast.
Inspect the dead body without looting
At the end of the passageway there is a dead body that is guaranteed to hold at least one piece of Divine gear. Search it to view the contents, then stop. Do not take anything unless a Yasakani Magatama is actually in there. This is the step that the whole method turns on.

Reset with a Travel Amulet if no Yasakani dropped
No Yasakani means you leave everything on the ground and burn a Travel Amulet. That teleports you straight back to the start and you run the well again. Taking the loot here is the one irreversible mistake in this guide, because the corpse never refills once emptied and the run is spent.
Take the Yasakani, then quit the mission
When a Yasakani Magatama finally appears, pick the loot up. Since the corpse will not respawn after being emptied, a Travel Amulet is no longer enough to reset it. Quit the mission manually and reload to get a fresh corpse, then start the loop over.
Kyoto Palace Crucible Loop
Unlock the Imperial Palace shortcut
Load the Scion of the Gods battle scroll to reach the Kyoto Imperial Palace Crucible, then push through the zone far enough to open the shortcut near the Imperial Palace ground shrine. This is the one route in the guide that prefers New Game Plus or Shogun's Journey rather than Heir's Journey.
Funnel the spirits and wipe them
Move to the middle of the second room and cast Hellfire twice while the spirits follow you in. Let them bunch up properly before committing, then cast Hellshock twice to clear the group. Casting early wastes the second Hellshock on a spread-out pack.


Edo Castle Passageway Loop
Open the passageway shortcut
Start at the Passageway Shrine in Edo Castle, reachable through A Sinister End. Head into the samurai room, ride the spirit vein up, cross the roof debris, and skip past the lightning jailer rather than fighting him. Take the next spirit vein down, pull the paper wall talisman to reveal the secret passage, clear the Nurikabe blocking it, and open the shortcut door. This setup is a one-time cost that every later run reuses.
White Drawing Room Loop
Reach the White Drawing Room shrine
This spot is also in Edo Castle through A Sinister End. Work through the level until you reach the White Drawing Room shrine and activate it. The creator rates this the best overall spot on a first playthrough, since it needs no shortcut setup beforehand.
Endgame: The Optimized Luck Build
Rebuild around Grace of Ebisu
Once the first spots have produced Divine gear and a couple of Yasakani, rebuild for luck. Grace of Ebisu is the target, since its bonuses run Luck +20 at three pieces, Luck +50 at six, and Item Drop Rate +20% at seven. Put Grace of Ebisu on your weapons and ranged gear at level 159, keep three Sohaya pieces for the Crucible luck, swap your leg guards to an Ebisu piece, and equip Onmyo Hunting Shoes plus two Yasakani Magatama carrying Ebisu. Onmyo Hunting Shoes belong to no set, which is exactly why they can hold a Divine Grace at all. Note that ninja and samurai Yasakani are different items, so check which one you are equipping.

Add Grace of Daikokuten once Yasakani frees the slots
Yasakani Magatama lowers every set's piece requirement by one at the same time, so six Ebisu pieces already pay out the seven-piece Item Drop Rate bonus. That leaves slots spare, and Grace of Daikokuten is the natural second grace because its three-piece bonus is Equipment Drop Rate +5%. Two things to know before you split. The Yasakani effect does not stack with itself, so wearing two still gives you a single point of reduction, and you need two actual Daikokuten pieces to reach its three-piece tier. One lone piece grants nothing at all.